
Mini trucks are not just vehicles; they embody creativity, engineering, and personalization. Whether you’re a local small business owner looking for innovative ways to promote your services, a residential property owner who wants a fun project, or a dedicated mini truck enthusiast aiming to express your individuality, you’ll find joy in building your own mini truck. This guide takes you step-by-step through three exciting projects—from crafting a mini truck using simple paper, to building an electric version with recycled materials, and finally customizing with eco-friendly cardboard designs. Each chapter serves a distinct purpose while enhancing your overall understanding of how to make mini trucks that reflect your personality and promote sustainable practices.
Folded Freight: Crafting a Paper Mini Truck as a Gateway to Resourceful Engineering
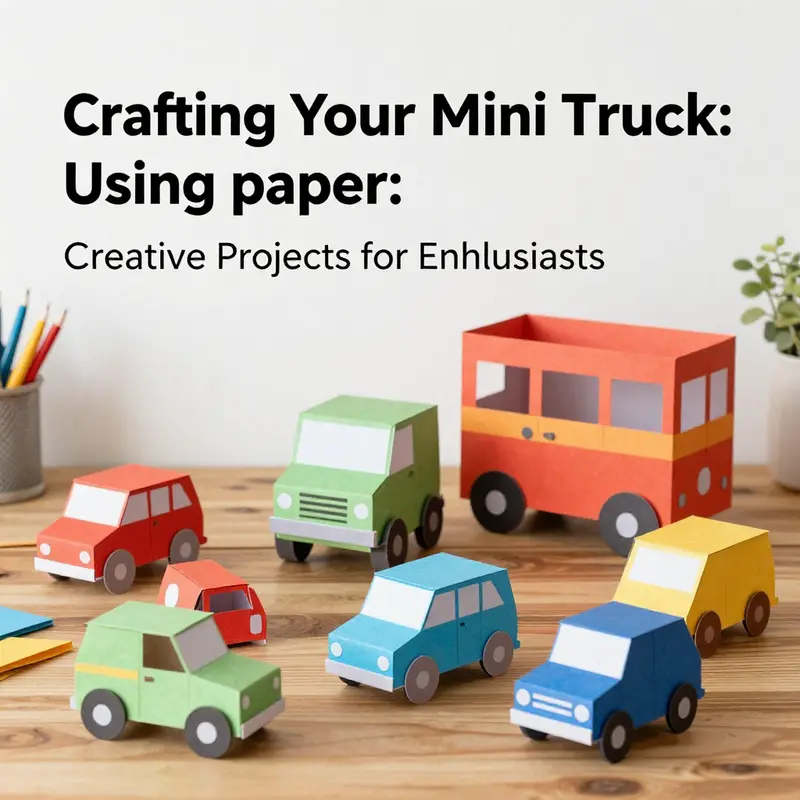
The quiet act of folding a square sheet into a sturdy little vehicle can feel almost magical. In a world saturated with complex kits and power tools, a simple sheet of paper becomes a laboratory for exploring shape, balance, and practical design. The paper mini truck described here is more than a decorative toy; it is a small workshop where instruction and imagination meet. It starts with a single square, grows through careful folds, and ends as a three‑dimensional object with a surprising amount of character. The act of transforming a flatsheet into a tiny truck invites a child and a curious adult alike to see how geometry, symmetry, and a few deliberate decisions work together to create something both charming and useful as a learning tool. The method emphasizes resourcefulness and speed, with no glue required for the core model and only simple tools—just scissors for optional trimming and a pencil for light marking if needed. In this sense, the exercise is a microcosm of DIY practice: you begin with basic materials, follow a clear sequence, and emerge with a tangible product that can spark conversation about engineering principles and design tradeoffs.
Begin with the basics, and you set the tone for everything that follows. Materials are deliberately minimal: a single square sheet of paper, ideally 15 centimeters by 15 centimeters for a standard size, a pair of scissors if you wish to trim, and a pencil or pen for any light markings. The square base is not merely a starting point but a compact canvas where geometry can be observed in motion. The initial folds, diagonals, and creases are not just steps; they are the language that tells the story of the truck’s eventual form. When you unfold and refold along different axes, you reveal a grid of intersecting lines—an invisible map that guides you toward a three‑dimensional outcome. This is where math softens into craft: the crease pattern is a physical representation of symmetry, a blueprint that becomes real as you press the shapes into place.
The process unfolds as a careful conversation between the paper and the builder. Step One begins with the square base, a deliberate decision to work from a shape that carries inherent balance. This starting move is not arbitrary; it anchors the later proportions, ensuring the truck’s body sits comfortably on the imagined wheels. Step Two introduces the diagonal folds—folding the paper in half along one diagonal, then the other, and finally returning the sheet to a flat state so the X creases remain visible. These diagonals are more than marks; they act as guidelines for projecting the two‑dimensional surface into a three‑dimensional form. When you turn the paper over, Step Three invites the horizontal and vertical folds that create a plus sign of creases in the central region. The intersection of the X and the + crease patterns is where the core geometry begins to hum. It’s a small moment, yet essential: the central squares and the grid forces the subsequent layers to align cleanly, which makes the later shaping steps more predictable and satisfying.
Step Four is where the truck body starts to emerge from the folded fabric of potential. You lift the top two corners toward the center, forming a smaller diamond. Then you fold the left and right points of this diamond toward the center again, producing a compact square with a more pronounced depth. The body’s silhouette begins to take shape, and the paper seems to concede to a tentative three‑dimensional presence. Turn the model over as Step Five instructs, and the two top flaps are folded inward toward the center. This maneuver is more than a practical closure; it frames the front of the truck, shaping its profile and giving a sense of forward motion. The front becomes a face of the vehicle, with crisp edges that catch the light in playful ways. It is easy to overlook how a small adjustment to a fold can alter the perceived aggressiveness of the truck’s stance, but the fold geometry is precise enough that those changes register with the eye as intent and character.
Step Six shifts the focus to the wheels, a necessary sign of function and stability. On each side of the main body, the outer corner flaps are folded inward slightly to suggest wheel arches. If you want a touch more realism, a careful slit in the folded parts can create a more defined wheel shape. This is a tiny incision that does not break the continuity of the paper, yet it communicates purpose: wheels imply movement, and movement implies possibility. The beauty of the method is that these details arise from clean folds rather than extrusion or glued components. The result is a light, air‑thin model that nonetheless carries a strong sense of scale. Finally, Step Seven invites the builder to give the truck its finishing personality. By gently pulling apart the sides, the vehicle gains a soft three‑dimensional folder of its own. A light press with a pencil can sharpen the creases, making the model feel more deliberate, more museum‑like, and more ready to be admired on a desk, a shelf, or a classroom corner.
The joy of this paper version lies not only in the end product but in the quiet confidence it fosters. Because the truck is assembled with no glue, the act becomes an exercise in hold‑and‑shape discipline rather than glue‑driven construction. It teaches patience, precision, and the idea that geometry, when treated with care, can translate into tangible form without requiring expensive tools or heavy materials. There is something oddly satisfying about a model that can be unfolded and flattened again without losing its integrity. It invites experimentation: what happens if you start with a larger square, or if you choose a slightly different sequence of folds? How does adding a color on the surface change the perception of the truck’s personality? These questions are not merely playful; they are invitations to think about design decisions and how a small change can ripple through the final appearance.
For readers who want a broader window into the ecosystem of mini trucks and small‑scale builds, the online community offers a reservoir of ideas. A quick visit to minitrucksocala.com/blog provides a curated space where makers share observations, tips, and a gallery of tiny vehicles that illuminate the potential of compact design. The link below links you to a hub of ongoing projects and reflections, inviting you to see how similar constraints—limited materials, simple tools, and a need for function—produce a surprising variety of outcomes. minitrucksocala.com/blog
Beyond the surface of the paper model, the exercise serves as an accessible entry point into the broader discipline of lightweight engineering. Paper forces you to think about where strength comes from and how to distribute it with intentional folds rather than structural adhesives. The idea of folding a sheet to create a frame, a body, and wheel housings demonstrates a fundamental principle: geometry can substitute for mass when used thoughtfully. In many ways, it mirrors the early stage of product development, where a simple concept must carry both form and function with minimal resources. The paper truck becomes a miniature stage on which basic physics plays out—the center of mass, the moment arms of the wheel wells, and the way the truck sits in a stable stance. Even when the model is only a few centimeters long, the same principles that govern a real vehicle apply, scaled down and distilled through craft.
The process also invites consideration of sustainability and materials literacy. Paper, as a medium, is inherently recyclable and light. The act of converting a sheet into a truck also implies a reverence for resource use: no glue means fewer chemical additives, and the possibility of reusing the same piece of paper to reconstruct or redesign. This encourages a mindset of iterative improvement rather than disposable consumption. When learners craft multiple versions, they begin to notice the tradeoffs that appear with scale, color, and texture. A larger paper size will naturally yield a more robust truck, but it may also demand more careful hand coordination and greater control of the folds. A brighter color or a patterned paper can transform the perceived personality of the vehicle, making it feel friendlier or more utilitarian depending on the color choices and line emphasis. A simple monochrome truck can feel elegant and architectural, while a patterned surface might remind one of a delivery van or a construction vehicle—each mood supported by a handful of thoughtful design decisions.
The method aligns well with a pedagogy of making that values process as much as product. A brief walk through the steps becomes a story about how a complex form can emerge from consistent practice. The tiered folds teach sequence, the symmetry teaches balance, and the final shaping demonstrates control over a three‑dimensional object that began as a flat plane. In classrooms, libraries, or at home, this kind of activity can serve as a bridge between art and engineering. It empowers students to articulate a plan, execute it with care, and reflect on the results with curiosity. The model also lends itself to extension: you can imagine adding windows drawn with a pencil, or sketching a simple driver’s silhouette on the body to give the truck a personality. If you wish to explore further, a range of related projects—ranging from cardboard buildouts to small wooden joints—can broaden the conversation while maintaining the spirit of resourceful, hands‑on learning.
Yet the beauty of the paper truck lies in its immediacy. The steps can be completed in a single sitting, and the result can be held, admired, and discussed without any specialized tools. The simplicity of the materials contrasts with the sophistication of the thinking that goes into each fold. It is a tactile reminder that complexity often begins with a handful of straightforward decisions and a willingness to experiment. The same approach can translate to more ambitious mini truck builds using recycled cardboard, lightweight wood, or other found materials, where the foundational principles remain the same: symmetry, balance, and a clean approach to joining parts. The paper model is, in effect, a primer on how to approach design with economy and efficiency, a reminder that great ideas often start as small, folded moments of insight.
For readers who want to see how this mindset translates into more robust builds, there is value in exploring related projects that expand on the same philosophy. Some builders begin with cardboard and craft knives to produce a more durable chassis, while others move toward repurposing small wooden blocks or popsicle sticks to create scale models that still adhere to the logic of proportion and weight distribution. These explorations do not replace the joy of the paper method; they complement it by showing how a single design principle can scale up across materials and contexts. The core lesson remains clear: good design emerges when you treat form with intention and you respect the constraints you are given, then innovate within them.
For educators and mentors, the paper mini truck offers a versatile platform to introduce measurement, geometry, and iterative design without overwhelming students with complexity. It is a gentle yet insightful way to demonstrate how precise folds translate into a predictable three‑dimensional outcome. When students watch a crease pattern transform into a solid object, they experience a concrete embodiment of abstract ideas. They learn to anticipate how a change in one part of the process might affect other features of the model. They see that attention to detail—the alignment of corners, the neatness of the folds, the crispness of the creases—places a capstone on a small, satisfying achievement. In this way, the exercise is not merely about making a truck. It is about cultivating confidence, curiosity, and a disciplined, hands‑on way of thinking that can carry over into more complex projects.
As the chapter closes, there remains a sense of openness. The paper mini truck is a starting point, a simple technology with a long tail of possible refinements. It invites makers to imagine the next steps: perhaps adding color accents, digitizing the fold pattern for a more precise reproduction, or using the same approach to craft different vehicle forms—a tiny hatchback, a compact cargo van, or a neat delivery scooter. The key idea is not to lock the craft into a single routine but to invite exploration—how minimal materials, careful folding, and thoughtful shaping can yield a vehicle that embodies both charm and learning. By embracing this approach, builders of all ages can experience the satisfaction of turning a flat sheet into an object with personality and potential.
External resource for further inspiration and technique demonstrations can be found on widely used video platforms, where guided folds and real‑time demonstrations illuminate each step with extra clarity. These visual examples often highlight micro‑adjustments that improve the final form and show how subtle variations in pressure and crease depth influence the truck’s stance and stability. If you’re curious to see a broader range of folding techniques and related origami‑inspired craftwork, you can explore general folding tutorials and project walkthroughs on trusted video repositories. External resource: https://www.youtube.com
From Trash to Torque: Building a Mini Electric Truck from Recycled Materials
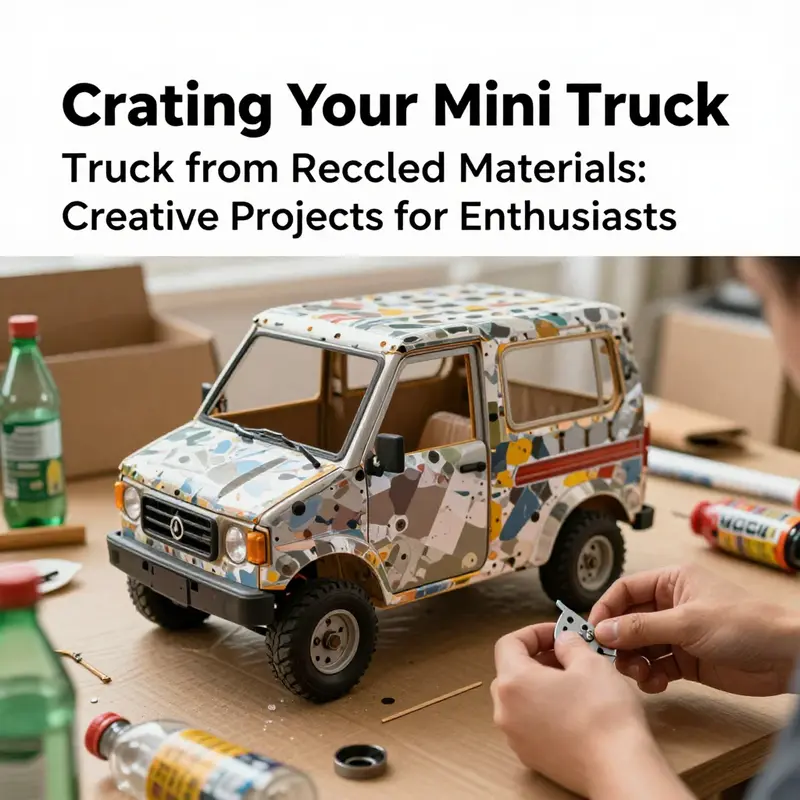
Crafting a functional mini electric truck from recycled materials blends hands on making with basic physics. This chapter guides you to repurpose common waste into a drivable micro vehicle, teaching concepts like leverage, simple circuits, and iterative design. The aim is to keep costs low while maximizing learning through doing. Expect to adapt steps to your parts and workspace, and enjoy the problem solving that comes with making.
Start with a plan and a parts list. Typical recycled components include a lightweight chassis from a flattened aluminum can, wheels from bottle caps, a small DC motor from a toy, and a compact battery holder from old electronics. Simple axles can be made from wooden skewers or dowels. Salvaged gears or cut pieces from toys can form a workable drive train. Use scrap cardboard or plastic for braces and aesthetic parts. Basic tools are a hot glue gun, scissors, wire cutters, tape, a small screwdriver, and a hobby knife. Safety gear such as gloves and eye protection makes cutting safer. Gather parts by inspecting old gadgets and recyclables; substitutions are often possible.
Design the chassis first. The goal is a stiff, lightweight base that keeps the motor and battery balanced. A flat strip from an aluminum can makes a surprisingly rigid frame when opened, flattened, and reinforced with tape. Mark where axles, motor, and battery will sit, then plan a simple rear or mid mounted payload area.
Wheel and axle setup is crucial for smooth motion. Bottle caps become wheels when drilled or melted to accept an axle. Ensure the axle passes through the center and rotates freely. If restraint is needed, tiny bushings from plastic or cardboard reduce friction. Add a little mass inside the caps for balance if needed. Align axles carefully to keep tracking straight.
Mount the motor and build the drive train. Mount the motor to the chassis with glue or tape, pointing the shaft toward the axle. Attach a small gear to the motor shaft if possible, or use a friction drive by pressing a rubber wheel against the axle wheel. A gear train improves efficiency, so salvage gears if you can. Ensure gears mesh without binding and adjust the motor height if needed to prevent rubbing.
Electrical connections are straightforward. Use a two AA battery holder and insulated wires. Soldering is ideal but twist and tape works too with hot glue for strain relief. Observe polarity; reversing leads will spin the motor the other way. Optional switch between battery and motor gives on off control. Secure the battery holder so weight is balanced and not tipping the chassis.
Testing and calibration follow assembly. Place the truck on a flat surface, power the circuit, and observe wheel rotation and motion. Check for loose wires, free gears, and axle friction. If wheels slip, add traction or modify the ground contact. Compare gear ratios to optimize torque versus speed and record outcomes. This is a great chance to illustrate mechanical advantage and the trade off between speed and torque.
For stability and steering, increase wheelbase to improve directional stability. If the truck veers, fine tune wheel alignment and ensure axles run parallel. A simple front axle hinge can help it self center. For cosmetics, add a cab from cardboard, decorate with scraps, or mount a flatbed for style. Keep the design modular so components can be swapped for experiments.
Beyond basics, add extensions such as a switch for control, parallel battery packs for more runtime, or a small PWM controller for speed variation. If you have a tiny servo or microcontroller from scrap electronics, you can attempt basic steering or speed control. A simple differential like mechanism can be explored with care for turning.
Safety and sustainability lessons accompany the project. Handle sharp metal with care, avoid shorts, and dispose batteries responsibly. Reuse parts to reduce waste and inspire thinking about circular economy concepts.
Troubleshooting tips. If a wheel wobbles, re balance by adjusting the axle or adding small washers. If the motor stutters, check friction and test the motor separately. If gears grind, re space or lubricate gently with a drop of silicone. If the motor overheats, pause, cool, reassess gear ratios and battery voltage. Keep simple notes of changes to track what works best.
Finally, reflect on the learning. Building a mini electric truck from recycled materials demonstrates how constraints spark creativity, how small adjustments affect performance, and how making builds confidence in practical engineering. With a can, a motor, some gears, and a bit of persistence you can create a moving project that teaches and inspires.
From Boxes to Backroads: Designing an Eco-Friendly Cardboard Mini Truck
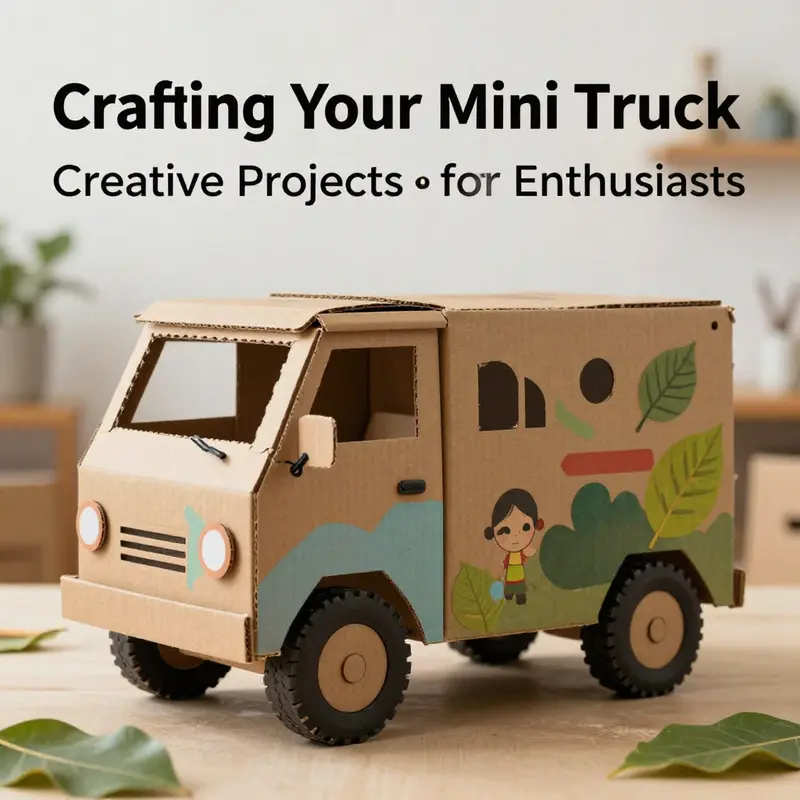
Building a mini truck from cardboard is a hands-on way to combine creativity, basic engineering, and environmental stewardship. This chapter guides you through a single, coherent process that turns ordinary boxes into a durable, personalized mini truck while teaching practical skills in measurement, structural thinking, and aesthetic design. The emphasis is on upcycling: taking what would be waste and turning it into something useful, fun, and expressive. The approach is flexible, so it fits classrooms, family workshops, community makerspaces, and solo projects.
Start by looking around for suitable cardboard. Choose two sturdy boxes—cereal, shipping, or corrugated packaging work well. Clean, dry, and intact cardboard gives you a better structural base. Thinner paperboard can be used for details, but the chassis and cargo area need strength. Gather scissors, a utility knife, a straightedge, a pencil, strong tape, white glue, glue sticks, and a few simple fasteners like brads or wooden skewers. For wheels, you can cut circles from layered cardboard or repurpose bottle caps or round lids. Collect decorative items such as paint, markers, stickers, and fabric scraps. Keep safety equipment on hand: a cutting mat, protective gloves if needed, and adult supervision for young builders.
Measure twice, cut once. Begin by measuring the dimensions of the two boxes. Decide on the scale of your mini truck: a compact pickup might be 25–30 cm long, while a larger cargo-style truck could be 40 cm or more. Use one box as the base and the other to add length and reinforce weak points. With a pencil and straightedge, mark the chassis shape on the cardboard. A practical chassis is a long rectangle with a slightly tapered front to hint at aerodynamics. Cut the pieces carefully, making clean, straight edges. If your cardboard is corrugated, consider orienting the flute direction across the chassis width to improve load-bearing capacity.
Reinforce the chassis by layering cardboard. Glue a second layer to the underside of the base to create a strong, flat platform. Tape along seams and edges to prevent delamination. Where two boxes meet, overlap by at least 4 cm and secure with strong tape before applying glue. This overlap prevents stress points and reduces the chance of tearing. If you plan to carry small items in the cargo area, add an inner support strip—two narrow strips of cardboard glued along the length of the chassis—so the central span won’t sag under weight.
Design the cab and cargo areas as integrated elements rather than separate attachments. Cut the cab profile from A4 or similar paperboard to create windows and a windshield shape. Use small tabs at the base of the cab cutout to glue it neatly to the chassis. For the cargo box, cut a rectangular box from a single sheet, scoring fold lines before folding and gluing the sides. Greaseproof scoring makes cleaner corners. Attach the cargo box to the rear of the chassis with glue and tape, taking care to keep it square. Adding an internal crossbeam under the cargo area increases rigidity; use a folded cardboard beam glued across the width for extra strength.
Functional elements give your mini truck activity beyond decoration. Wheels must be round, strong, and mounted on axles that allow rotation. Cut wheel disks from thick cardboard and glue three layers together per wheel to prevent warping. Alternatively, use plastic lids or wooden beads for a robust option. For axles, wooden skewers or thin dowels work well. Poke holes through the chassis in line with your wheel placements, reinforce these holes with small washers of cardboard glued around them, and thread the axle through. Secure wheels with a dab of hot glue on the outside of the axle or with small knots if using twine. If you want freely turning wheels, use brads as pivots—insert brads through wheel centers into the axle and bend the brad legs inside the chassis to lock them.
A foldable tailgate adds play value and functional realism. Cut a rectangular piece for the tailgate, score a fold line, and attach it with tape or a thin strip of fabric to form a hinge. Reinforce hinge points with tape to prevent tearing. Consider making the tailgate removable or lockable with a simple paper clip latch for cargo security. For an extra feature, add side panels that slot into recessed grooves cut into the cargo box. These can be interchangeable, allowing different cargo configurations—flatbed, enclosed box, or open bin.
Strengthen common failure points. Corners, wheel wells, and hinge areas get the most stress. Reinforce them by gluing small triangular gussets inside corners. For wheel wells, cut circular openings slightly larger than the wheel diameter and reinforce the edges with a glued ring of cardboard. If your truck will be lifted or carried often, add a load-bearing handle under the chassis with a folded strip of cardboard or a recycled plastic strip glued across the center. Keeping reinforcements discreet preserves aesthetics while extending durability.
Decoration should echo the eco-friendly story. Prime the surfaces with a light wash of white glue thinned with water to give paint a smooth base. Use watercolors, acrylics, or markers depending on the look you want. Emphasize natural motifs or sustainability themes—leaf logos, recycling symbols, or faux wood grains made with dry brushing techniques. Apply stickers or fabric patches made from scrap textiles to add texture. Lettering can be hand-painted or cut from colored cardstock and glued on. Encourage builders to create a backstory for their mini truck: a neighborhood delivery van, a seed-planting rig, or a tiny mobile library. This narrative element enriches the build and connects it to broader environmental motivations.
Incorporate interactive educational elements. Label parts of the truck to teach basic mechanical vocabulary: chassis, axle, cab, tailgate. Add a small removable cargo load to illustrate weight distribution and balance. Use this opportunity to demonstrate simple physics: how axle placement affects stability, how enlarged contact area spreads load, and how reinforcements counter bending. For group or classroom settings, turn the build into a design challenge: who can create the lightest cargo bed that carries the most weight? Or who can design the most aerodynamic front profile with the least material? These constraints foster problem-solving and creativity.
Think about finishing touches that extend lifespan. Coat high-use areas with clear varnish or diluted PVA glue to repel moisture. Attach felt or cork pads under the chassis to prevent scuffing and to give a tactile finish. Store the mini truck away from damp spaces, and when repairs are needed, keep an accessible repair kit with extra tape, glue, and spare cardboard. Designing for repairability reinforces circular economy thinking: products that can be fixed last longer and reduce waste.
Customization options are nearly endless. Add headlights made from aluminum foil discs, mirror decals from reflective paper, or rearview mirrors fashioned from small squares of foil-backed card. Create a roof rack from thin wooden skewers or unused plastic straws, and secure them with tape and glue. If you want electronic features, a simple LED circuit powered by a button cell can light the headlights. Keep circuits minimal and well-insulated, and supervise closely in projects involving small batteries.
Scale up the concept by combining multiple mini trucks into a fleet or by transforming larger cardboard structures into drive-in playscapes. A classroom might build a whole miniature town with roads, garages, and recycling centers. For community projects, invite local participants to donate clean cardboard and host a build day that pairs families or volunteers into teams. This communal approach multiplies impact and fosters local interest in sustainable design.
Finally, make sure the project communicates its eco-message clearly. Affix a label that explains the truck’s recycled origin and what materials were repurposed. Display simple facts about cardboard recycling and waste reduction. For older builders, introduce concepts like the circular economy and lifecycle thinking—how a product’s design influences its reuse and eventual recycling. Encourage participants to share photos and design notes online or in a community gallery to spread ideas.
For additional inspiration and community projects around small trucks and creative customization, explore the mini truck community blog for practical examples and owner stories. For a broader primer on sustainable design principles and practical guidance on eco-friendly materials and methods, see the U.S. Environmental Protection Agency’s resource on sustainable design: https://www.epa.gov/sustainable-design
This cardboard mini truck project does more than produce a toy. It builds resourcefulness and invites reflection on consumption, repair, and reuse. By carefully selecting materials, reinforcing weak points, adding functional features, and designing with repair in mind, you create a durable, meaningful object that teaches technical skills and environmental values. The result is a small vehicle with a big message: creativity and care can transform everyday waste into lasting, useful design.
Final thoughts
Building your own mini truck can be a delightful experience that combines creativity, recycling, and personalization. Each project outlined here—from paper crafting to electric builds and eco-friendly customizations—shows that there’s no limit to your imagination. These ventures not only give you a unique mini truck that embodies your style but also encourage sustainable practices in creative projects. Step out, share your creations, and inspire others with your mini truck masterpieces. The joy lies not just in the final product, but in the journey of making it!