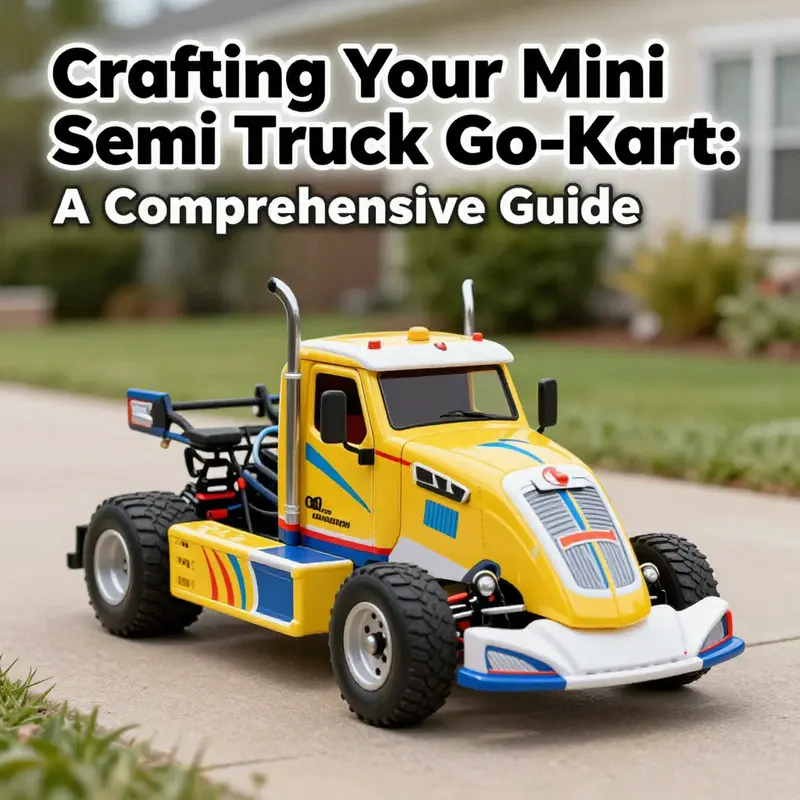
Building a mini semi truck go-kart is not just a creative project; it’s a unique blend of engineering and artistry that captivates both enthusiasts and hobbyists alike. Whether you’re a small business owner looking to create an engaging community experience, a residential property owner with a love for DIY projects, a mini truck aficionado, or just someone curious about this exciting endeavor, the journey begins with a vision. In the chapters that follow, we’ll dive into the key aspects of constructing your mini semi truck go-kart. From detailed design and planning to the intricacies of building the tractor unit and crafting a trailer, each step aims to enhance not only your technical skills but also your enjoyment throughout the process.
From Sketch to Street: Conceptual Design for a Realistic Mini Semi-Truck Go-Kart
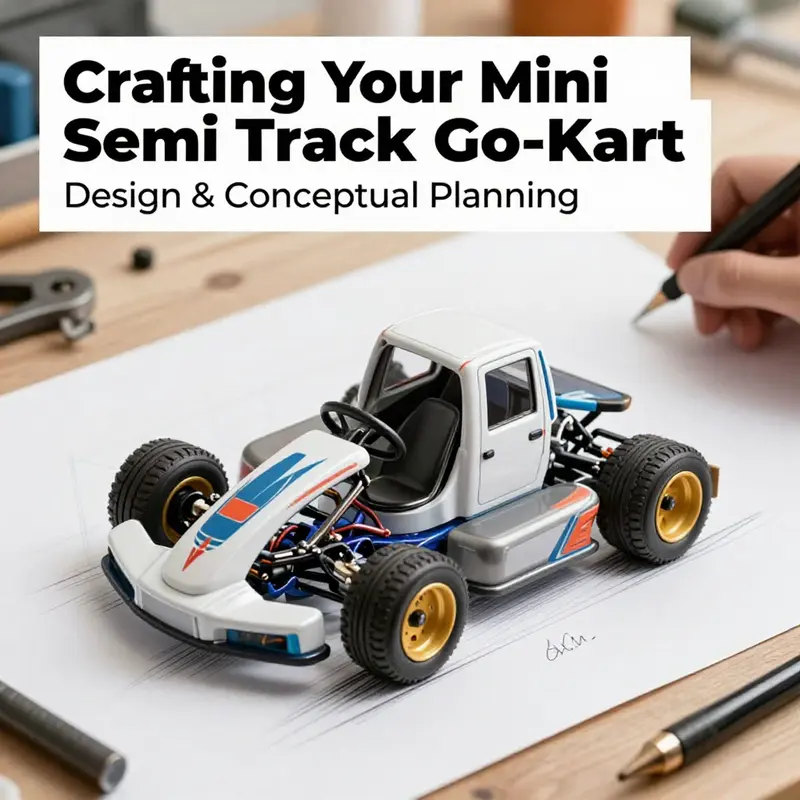
Conceptual planning is where a build like a mini semi-truck go-kart begins to breathe. It is the moment you translate curiosity into a tangible, drivable machine. The aim is not merely to assemble parts but to create a cohesive system that looks convincing and performs reliably. When you set out, you must decide how you want the vehicle to feel in the seat, how it will interact with its trailer, and how safe it will be in motion. The core questions center on purpose, scale, style, and function. Will this be a showpiece for display, a rugged off-road toy, or a compact utility runner capable of light hauling? The scale matters as much as the silhouette. A 1:4 or 1:6 rendition of a real semi-truck imposes different weight distributions, material choices, and drivetrain sizing. The style—realistic versus stylized—guides every line you draw, every window you enclose, and even the height of the cab. Functionality is the glue that holds design together. If you want a retractable trailer hitch, turning headlights, or a horn that speaks to your audience, you must plan early how these features will be powered, wired, and mounted without compromising safety or maneuverability.
One principle frequently echoed in builder communities is the emphasis on driving space and ergonomics. The driver should feel connected to the controls without feeling cramped. You want a seating position that allows a comfortable reach to the steering wheel, a clear line of sight to the road or floor, and enough knee clearance to brake without bumping into the dash. This is not vanity; it is safety and control. A comfortable driver position reduces fatigue and increases responsiveness during turns, climbs, or when maneuvering a trailer. In practice, this means laying out the cockpit with the steering wheel within easy reach, pedals arranged so the driver can depress them with a natural bend in the knees, and a seat that supports long periods of operation without fatigue. The first step toward this is a thoughtful mockup. Sketch out your cab and trailer in scale, then sit in a representative mock seat to verify reach and visibility. If the project is for younger drivers, consider how the driving position might adjust as skills grow and the rider’s height changes over time.
The planning phase also informs the choice of materials and assembly methods. When you are building something that visually mimics a semi-truck yet must remain within the bounds of a go-kart, every choice matters. Aluminum extrusion profiles offer a light, rigid backbone for a modular frame that can be disassembled or reconfigured. They also enable a two-part system: a principal cab frame and a detachable trailer hitch section connected through a pivot or ball-joint arrangement. This articulation mirrors a real tractor-trailer and keeps the build approachable. In practice, this modular approach means you can swap out parts without needing to cut and weld every time you want to adjust the wheelbase or trailer height. It also supports upgrades, such as adding a more robust trailer hitch or a different suspension layout later in the project. If you opt for steel tubing for durability, you gain stiffness and load capacity, but you also accept heavier weight and more intensive fabrication, welding, and alignment work. Either path can work, but the modular aluminum route tends to be friendlier for beginners and those aiming for a lighter, more transportable model. Regardless of material, you should design with assembly in mind: joinery that can be tightened with standard tools, brackets that can be swapped, and protective housings that keep wiring and hot parts away from the driver’s seat.
The scale decision also interacts with the power system. An electric drive yields a compact footprint and quiet operation, a welcome feature for indoor settings or family-friendly use. A gasoline option, while louder and more complex, offers a more convincing sense of power and longer run times between charges. In conceptual terms, you can start with a simple electric package—a brushless hub motor with a compact controller and a lithium battery pack mounted low in the chassis for a stable center of gravity. A typical beginner setup could use a 500W–1000W motor as a baseline. The battery choice matters: a 48V system paired with a 20Ah pack provides a practical balance of range, weight, and space, especially when the goal is a 1:4 or 1:6 scale. Wiring should be planned with a master switch close to the battery to cut power instantly. This 50-amp or similar main switch becomes a safety cornerstone, ensuring a quick, unequivocal shutoff for inadvertent starts or maintenance. If you lean toward a gasoline-driven concept, you will need a small, accessible engine mounted behind or near the driver’s seat, with a firewall to separate engine heat from the cockpit, plus a simple chain or belt drive to the rear axle. In either case, your plan should specify a robust braking system, ideally with disc brakes at the rear and drum brakes at the front, and a braking bias that respects your wheelbase and weight distribution. The visual language of the powertrain—exposed pipes for a classic look, or fully enclosed housings for a clean profile—helps set the tone and influences the surrounding chassis styling.
With the propulsion in mind, the chassis design can proceed with a clear sense of weight distribution and structural integrity. The cab and trailer must feel like a single, integrated system even though they move independently. The trailer’s articulation is a defining feature. A pivoting drawbar or a ball-joint neck can provide a convincing range of motion without loosening the entire assembly. The trailer should not only mirror the truck’s appearance but also behave like a practical extension: a driver who wants to load a small payload should be able to detach and reattach with relative ease, and the trailer’s wheels should stay aligned and stable through turns. For authenticity, you can implement a basic yet effective fifth-wheel or pin-and-ring coupling, which behaves similarly to the LEGO and real-world analogs you’ve studied. When you couple a trailer, you should anticipate the added load path into the drivetrain and chassis. The chassis must be stiff enough to resist twisting while the trailer is connected, and the articulation joint must allow safe, controlled cornering. The design philosophy here is to compress dimensions without sacrificing layout quality. A compact build is easier to transport, easier to store, and more forgiving in small indoor spaces where you might test drive or display the kart.
Construction then becomes a balance of three overlapping systems: structure, propulsion, and motion. The frame must be rigid enough to resist flex under load, yet modular enough to be adjusted as the project evolves. The powertrain must deliver reliable torque while fitting within the chosen footprint, and the suspension must keep the wheels planted on varying surfaces without compromising steering or stability. Steering, too, plays a central role in this harmony. A rack-and-pinion system offers good responsiveness, but a modified bicycle front fork can also yield a compact, cost-effective solution that’s friendly to beginners. The steering linkage should be short enough to avoid excessive play or delay, while maintaining a comfortable sweep of the wheel and an intuitive steering wheel feel. In this design space, every choice feeds the next—frame geometry informs steering angles, which affects the trailer’s attachment geometry; powertrain weight influences seat height, which in turn shapes visibility and control reach. The beauty of conceptual planning is that it’s a living process: you sketch, you measure, you reassess, and you refine. A practical starting point is to review existing project blueprints or CAD models to understand how real-world constraints translate into a compact build. If you can access CAD resources, you’ll discover how professionals balance stiffness, weight, and manufacturability, then adapt those principles into a simplified, home-friendly version. For broader inspiration and ongoing ideas, you can explore community resources that document continuing DIY projects and their design decisions. A good starting point is the community blog that collates build experiences and practical tips, providing a sense of how others have solved common problems. You can find it at minitrucksocala.com/blog.
As you move from concept to concrete plan, you start to lock in the most consequential decisions: how big will the cab be, how long will the wheelbase stretch, what is the maximum payload you want to support on the trailer, and what kind of environment will shape your testing and use. If you want to maximize safety as you push toward higher speeds or rough terrain, you build in a safety-first ethos from the start. This includes a full roll cage around the driver’s cockpit, a reliable seat belt system, guards around moving parts, and an emergency kill switch that is easy to reach in an emergency. You also commit early to a lights and signaling scheme that makes your mini-semi visible in low light, with LED headlights and taillights integrated into the body or mounted within protective housings. In any practical build, the physics of motion matter as much as the aesthetics. Weight distribution, center of gravity, and braking performance all influence how a user will experience the vehicle on a driveway, in a parking lot, or on a dirt path. Your concept should therefore specify where the heaviest components sit—usually low and toward the center of the chassis—and how the trailer’s mass is carried to avoid uncontrollable sway or jackknifing. A well-conceived blueprint will consider how the driver interacts with the vehicle at low speeds for testing and high speeds for demonstration. If the plan includes a remote-control option for younger drivers, you should design the vehicle so that the remote can safely override or pause operation, and that the manual controls remain accessible and intuitive for a supervised ride.
In sum, conceptual design for a mini semi-truck go-kart is not merely about assembling a look. It’s about engineering a compact, safe, and enjoyable system that captures the essence of a full-size semi while remaining suitable for a DIY environment. The trajectory begins with a clear vision—your purpose, scale, and styling—followed by a robust structural strategy that supports modular, adjustable assembly. The powertrain and drivetrain then shape the chassis, steering, and suspension, with the trailer acting as a functional extension rather than a decorative appendage. Safety and ergonomics thread through every decision, ensuring the final machine is not just striking to view but reliable to operate. When you think through these layers together, your concept begins to feel real before you cut a single piece of metal. And as you prepare to translate this concept into a tangible build, remember that your next steps will be guided by the same principles that underpin all successful DIY engineering: measure twice, cut once, and design with the end user in mind.
If you’re seeking a practical starting point for the concept-to-frame phase, layering your design with modular components can simplify fabrication and future upgrades. Visualize the cab as a compact space with a driver’s seat aligned to a straightforward steering column. The trailer can be a detachable module with its own small axle and wheel set, connected by a pivot that allows a natural steering arc while maintaining alignment between the two parts. This approach also accommodates future improvements, such as updating the battery pack or enhancing the trailer’s lighting system without reworking the entire chassis. When you reflect on the design as a cohesive system rather than a collection of parts, you’ll find the route from imagination to road becomes clearer. This mindset—coupling realistic scale with practical construction—helps you avoid overcomplicating the build while ensuring the final vehicle remains faithful to its semi-truck inspiration. And with each iteration, your understanding of weight distribution, control, and aesthetics deepens, paving the way for a final piece that can be both a showpiece and a dependable driver.
For ongoing inspiration and broader context, consider exploring community resources that outline modular construction and shared experiences from other builders. They often offer fresh ideas about how to organize a frame, where to locate the battery for optimal balance, or how to design a trailer hitch that remains robust through repeated use. If you’d like to see a broader range of DIY go-kart projects that embody similar principles of modular design and economical fabrication, you can reference the broader blog ecosystem that captures these practical insights. See the community blog here: minitrucksocala.com/blog.
As you finalize your conceptual plan, hold a clear picture of the vehicle in your head but always keep a margin of safety and a focus on ergonomics. Your goal is not just a convincing silhouette but a system that performs predictably, repairs easily, and teaches you something with every step. The design language should be practical, with the cab and trailer integrated by a deliberate articulation mechanism, a drivetrain chosen for its balance of torque and weight, and a chassis that remains rigid under load while allowing for modular upgrades. The result is a mini semi-truck go-kart that feels like a serious project yet remains accessible to home builders. With careful planning and a steady hand, you can translate your concept into a vehicle that brings joy, teaches fundamentals of design and fabrication, and stands up to real-world use.
To close this phase, keep a lean BOM (bill of materials) and a sensible build plan that prioritizes safety features, ergonomic reach, and a scalable frame. Your chapter of design has now laid out a path from idea to structure, from powertrain to trailer integration, and from safety to aesthetics. The next step invites you to bring the concept into a practical, testable form—where you’ll assemble the frame, mount the drive system, and begin to test the vehicle’s handling with or without the trailer attached. The resulting mini semi-truck go-kart should feel like a compact, energetic rendition of a full-sized tractor-trailer, while remaining fun, approachable, and safe for your chosen audience.
If you want to dive deeper into practical build details, you can consult broader DIY resources and forums, while keeping the focus on modularity and safety. You’ll find that many builders favor lightweight frames, simple yet sturdy articulation, and a careful balance of power, weight, and steering response. And as you explore, you’ll likely discover small variations that fit your space, skills, and ambitions better than any generic template. The road from design to reality is not a straight line, but a well-lit path that rewards patience, precision, and a passion for crafting. The chapter you’ve created in your mind now becomes a blueprint you can walk through, a plan you can refine, and a project you can complete with pride. For those who want to share their progress and learn from peers, the journey is as valuable as the outcome.
External resource for visual guidance: https://www.youtube.com/watch?v=exampleminisemi_gokart
Tractor Unit: Designing the Chassis for a Mini Semi Truck Go-Kart
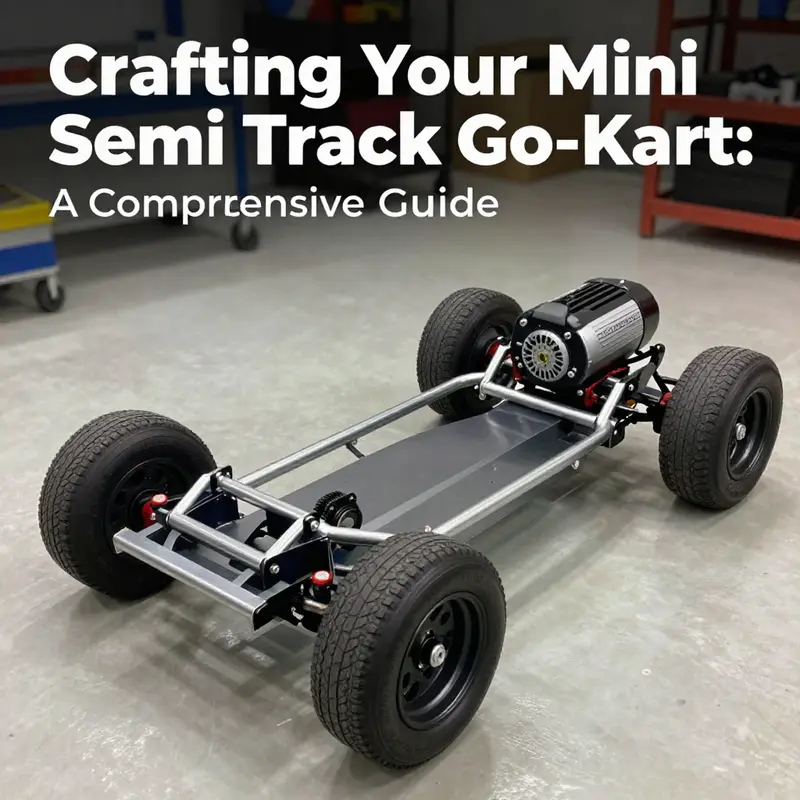
The tractor unit forms the foundation of a mini semi truck go-kart. This chapter covers layout, materials, welding versus bolting, suspension considerations, engine or motor mounting, rear axle alignment, and steering geometry. The goal is a rigid, square frame with predictable handling and a solid platform for trailer integration. Practical steps include planning wheelbase, selecting frame rails, fabricating cross-members, and ensuring alignment and safety. Emphasize modularity so powertrains or suspensions can be swapped with minimal changes. Safety is paramount: plan for secure seating, test at controlled speeds, wear PPE, and verify fasteners, joints, and steering tie-ins before any motion.
How to Build a Mini Semi Truck Go Kart: Constructing the Semi-Trailer
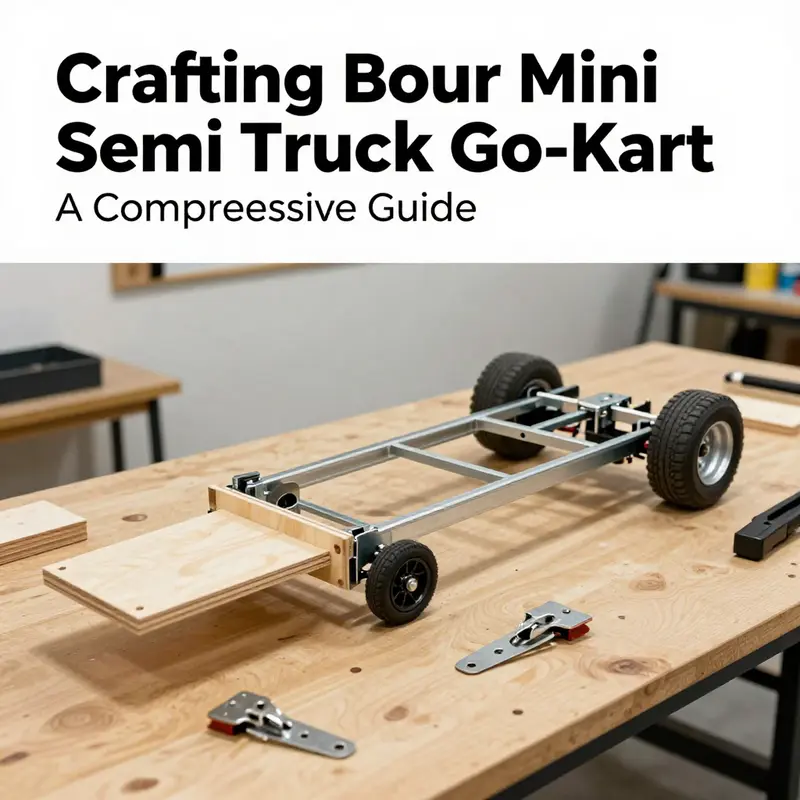
The project of a mini semi truck go kart invites you to think like a designer, a builder, and a tactician all at once. You are not merely assembling wheels and a frame; you are shaping a small-scale illusion of a real tractor-trailer that can move under its own power, respond to a driver’s input, and carry a payload of imagination as much as any pretend cargo. The semi-trailer, in this sense, is the hinge that ties the entire concept together. It must look convincing, it must function in a controlled, safe way, and it must connect cleanly with the tractor unit so that the entire vehicle reads as a single, purposeful machine. To achieve this, you begin with a clear sense of scale, then translate those scale decisions into a robust structure, a dependable coupling, and a set of details that bring the model to life without sacrificing safety or reliability.
Scale determines behavior as much as appearance. In many LEGO-inspired or metal-kit inspired mini-trailers, builders choose a scale that makes the trailer visibly proportional to the cab. A common choice is 1:4 or 1:6, which keeps the trailer’s length manageable while preserving the visual relationship to the cab. With that decision in mind, you can design a trailer that sits at the correct height relative to the tractor so the cab and trailer meet with a plausible articulation. A practical rule borrowed from detailed toy-and-model building is to set the trailer’s cargo bed height at about one brick higher than the chassis height of the truck portion. If you translate that into a real-world mindset, it means ensuring the top edge of the trailer couples with the cab so that the two read as a unified towing unit rather than two separate toys stacked on the same chassis. This height relationship helps when you design the connection point and determines how the trailer will sit visually when the cab is at rest.
The frame of the semi-trailer is the skeleton that gives your vehicle strength and longevity. You can imagine it as a compact, purpose-built platform that borrows the best ideas from two sources: the rugged efficiency of a metal-kitted assembly and the modular simplicity of recycled-material projects. For a trailer of this scale, a robust frame can be built from straight steel tubing or aluminum extrusions. The goal is to create a rectangular platform with a length that mirrors the cab’s proportion and a width that respects the vehicle’s overall footprint. Cross-bracing is essential here. It keeps the frame rigid, dampens twist, and provides anchor points for the side rails, toolboxes, and tail lights that will later transform the trailer from a mere box to a functional miniature of a highway car carrier. Cross-bracing also matters when the trailer needs to detach and reattach easily with the tractor. A two-axle setup on a trailer of this size often delivers a convincing balance of load distribution and stability. It’s the same principle you’d apply when planning a full-size trailer: more contact with the ground translates to more predictable handling at low speeds typical of go-kart usage, and it helps prevent sway when someone takes a quick turn at modest speeds.
A critical design decision concerns the coupling between the tractor and the trailer. The coupling system acts as the heart of the system’s interaction, guiding how the two halves work together during movement and how convincingly they read as a single vehicle. In the LEGO-inspired approach, you can imagine a quiet, mechanical notch or a small pivot that allows the trailer to align with the truck and then lock into place for travel. For a DIY go kart, you might implement a ball hitch or a pin-and-ring connector that locks the trailer to a drawbar coming from the cab. The trick is to strike a balance between ease of use and realistic behavior. The connection should be robust enough to withstand the bumps of a backyard course and forgiving enough to allow simple uncoupling when you want to reposition or load the trailer into storage. If you want to push realism further, consider a rotating joint concept that mimics the fifth-wheel coupling found on real semis. While you don’t need a full-scale fifth wheel at this scale, a carefully designed rotating joint can deliver a natural articulation and a satisfying “clunk” when the trailer settles into place. The core idea is to capture the function without complicating maintenance or safety.
Materials for the trailer frame can be as humble as recycled pallets transformed into planks, reinforced with screws and hidden joints, or as refined as aluminum profiles cut to length and bolted with ready-made brackets. The LEGO-inspired planning helps you think through how the bed of the trailer sits relative to the cab and how the wheelbase lines up. If you choose wooden construction for the bed, you gain the advantage of rapid iteration: you can cut, fit, and test in a single weekend. If you choose metal or aluminum, you gain stiffness and longevity, but you’ll need more precise fabrication and appropriate cutting tools. Either path benefits from attention to junctions and bracing, ensuring the trailer doesn’t rattle at low speeds or, worse, tilt unexpectedly on a corner.
The trailer’s wheel assemblies are the other crucial anchor points for the whole build. The choice of wheels, tires, and axles influences stability as much as aesthetics. In a mini semi-trailer, you’ll likely use wheels in the 8- to 10-incher range, with an axle setup that accommodates a straightforward mounting strategy. A pair of axles with simple leaf-spring or rubber-bushed suspensions provides a realistic ride quality without adding excessive complexity. The goal is to have the trailer track straight behind the tractor during gentle pulls, yet remain responsive enough to turn with the go kart’s steering inputs. You want the trailer to feel integrated, not like a separate trailer being towed by a toy car. The tires should be chosen to balance grip and wear, especially if you plan to run the kart indoors where smooth floors demand lower rolling resistance but still require safety margins against slipping on unexpected creases or grainy surfaces.
Detailing takes the trailer from a basic platform to a convincing miniature. Small touches matter: the side panels, the tail lights, and the rear bumper all contribute to the reading of realism. The LEGO-inspired approach emphasizes precise toolboxes, mud flaps, and tail lights crafted from simple blocks and translucent red pieces that catch the light as you move. A shallow bed with edge rails helps to prevent pretend cargo from slipping off during a rough pull. For lighting, LED elements tucked into the tail-light clusters offer a bright, dependable glow that remains cool to the touch during extended play. Reflective tape or stickers enhance visibility and contribute to the overall authentic feel without requiring high-precision contact with the power system. A small, functional feature that elevates realism is a loading ramp at the trailer’s rear. A ramp built with a single large slope piece or a hinged plank can double as a practical entry point for your pretend payload or for simply stepping in and out of the cab. While a fully functional ramp is not strictly necessary, including one can anchor the trailer’s role in your imagination and make the build more interactive for younger drivers.
Inside the trailer, you can implement subtle cues that underscore scale and realism. Use a boxy, shallow interior to simulate tool storage or a spare parts bin, and consider adding a tiny “dashboard” on the trailer for the driver’s side, such as a small panel with a few painted dials and an on/off switch to mimic lighting. Even if those details are non-functional, they contribute to the sense that the trailer is purposeful and part of a complete vehicle rather than a static prop. The construction approach here leans into modularity. The trailer bed can be designed as a detachable module that can be swapped or upgraded as you refine the build. A detachable bed invites ongoing experimentation—you can try a lighter aluminum frame now and a more rigid steel version later, or you can swap from wood for a lighter setup to metal for a more durable, heavy-duty feeling. The modularity also makes maintenance easier. If something gets loose or bent during a play session, you can remove and repair the affected portion without disassembling the entire rig.
When you think about realism, the trailer’s silhouette matters just as much as its internals. The height, angle of the cab’s back wall, and the trailer’s side rails collectively convey the impression of a working truck rather than a toy. To get this right, you’ll spend time planning the geometry so the trailer aligns with the cab when the vehicle is at rest and moves in unison when you accelerate or brake. The LEGO-driven height alignment serves as a practical mental model here. Keep the bed height slightly elevated, ensure the connection point aligns with the cab’s fifth wheel region, and let the wheels on both units share a common baseline. If you want to push the boundary of fidelity, you can design a simple articulation at the hitch that allows a small degree of rotation. This helps the trailer follow the tractor more smoothly over uneven flooring and adds a touch of mechanical elegance that resembles real-world towing dynamics.
As you move from concept to construction, you will likely oscillate between two adjacent design dialects: the simple, robust approach rooted in recycled materials and the more refined, modular design inspired by high-end kits. The former favors quick wins and rapid iteration, letting you test fit and function with minimal up-front investment. The latter demands more precise fabrication but rewards you with increased rigidity, a cleaner finish, and a system that can be upgraded with removable panels, a more elaborate suspension, or even a capacious LED lighting array that traces the trailer’s outline. In practice, a hybrid approach often works best. Start with a sturdy wooden or aluminum frame, bolt on a two-axle wheel system, and connect a basic coupling that’s easy to operate. Then, layer in the details: side rails, tail lights, mud flaps, and toolboxes. Finally, consider lightweight removable panels that give you access to the interior for maintenance or upgrades. The result is a semi-trailer that feels tangible and true to scale, yet remains forgiving and safe enough for regular play sessions.
From the standpoint of safety and testing, the semi-trailer deserves careful attention before it ever sees a slope or a straight run. Static checks should confirm that all bolts are tight and that every critical joint carries a reasonable load path. You want no loose screws and no protruding edges that could snag clothing or skin. A low-speed test in an open area is wise to begin with; keep speeds modest, allow the system to settle, and watch for any tendency to yaw or sway. Brakes, if included, should respond predictably. If you added a rudimentary disc brake or drum option, test them separately from the steering and observe how brake input translates into deceleration. Helmets and basic protective gear should be part of any play scenario, especially when younger drivers are involved. For added safety, a simple roll cage made from steel tubing can be hung around the cab area, and a basic seat belt or restraint can help keep occupants safely positioned during enthusiastic driving. When gas-powered options are contemplated, the same safety discipline applies but with added ventilation, fire safety, and more stringent maintenance checks. In the electric variant, the layout should prioritize battery protection: a sealed compartment, waterproofing for the enclosure, and a clean routing path for wires to avoid pinches or chafing during turns.
The journey toward a fully realized semi-trailer also invites a continual refinement mindset. If you want to push beyond the basics, you can consider upgrades that align with the broader theme of modularity and DIY tinkering. Remote-control capability is a fun and accessible upgrade that can help younger drivers enjoy the experience with an adult in control or with a cooperative play session. Adding supplemental lights and a horn can enhance the sense of realism and create delightful interactions during dusk runs or indoor demonstrations. A simple suspension system—such as coil springs or rubber bushings—can improve ride quality by absorbing small bumps and keeping the trailer stable while navigating uneven flooring. For electric builds, a small battery monitoring system can help you understand the energy use and extend the life of your pack by encouraging mindful driving. Each upgrade should be evaluated for its impact on the trailer’s balance and its interaction with the tractor unit. The aim is not to create a fragile, hyper-detailed replica but a sturdy, engaging vehicle you can drive safely and proudly.
As you reflect on the semi-trailer’s role within the entire build, it helps to recall the learning embedded in the broader family of projects from which this concept borrows. The detailed LEGO-based instructions offer a blueprint for functional features like toolboxes, lighting, and a dependable coupling approach, while the premium metal-kit example demonstrates how a high-fidelity frame and removable panels can transform a simple trailer into a believable, serviceable component. The digital, game-inspired approach reminds us that modular construction is not just a physical technique but a way of thinking: build in stages, design around connections, and allow room for future upgrades. This hybrid approach—anchored in practicality and informed by imaginative modeling—produces a semi-trailer that not only looks right but behaves right under the rider’s control.
If you want to explore similar ideas visually or to see a related build in action, a broader context can be found in a well-regarded online resource that demonstrates building a compact electric truck with a connected trailer using recycled parts. The video series offers practical assembly techniques, wiring diagrams, and performance testing that align closely with the principles described here. For quick reference, you can check the following external resource: https://www.youtube.com/watch?v=Kqg9ZLrQX7o. While that guide focuses on a different specific vehicle, the core concepts—recycling materials, modular construction, wiring discipline, and careful testing—translate directly to the mini semi-trailer project and can serve as a valuable supplement to your hands-on work.
For ongoing inspiration and to see how others approach similar projects, you can also explore the wider DIY community via the site that hosts a steady stream of practical tips and case studies about small-scale vehicles and modular construction. This internal resource can provide additional perspectives and troubleshooting ideas as you refine your semi-trailer build. To connect with that broader context, you can visit the Mini Trucks blog, which offers a flow of posts about related design challenges and build log updates. Mini Trucks blog. This internal link, drawn from the broader project ecosystem, offers a relevant learning thread without pulling you away from your immediate construction goals.
In sum, the semi-trailer is more than a decorative appendage; it is a living part of the vehicle that mirrors the care you invest in the cab and the chassis. Its strength, its articulation, and its detailing create the story of a complete vehicle that can be enjoyed, studied, and improved upon. The approach combines the sturdy pragmatism of a modular frame with the playful fidelity of a scale model. It invites you to test, adjust, and iterate—reminding you that, in DIY vehicle building, the journey from concept to operation is as important as the finished look. Safety remains central, but so does the joy of seeing a backyard project transform into a little machine that can be steered, loaded, and proudly displayed. This is the art and science of constructing a mini semi trailer that convincingly completes a go kart rig, and the satisfaction of watching it perform when the accelerator responds to your touch.
External resource: https://www.youtube.com/watch?v=Kqg9ZLrQX7o
Final thoughts
Building a mini semi truck go-kart is a rewarding experience that encourages creativity and mechanical skills. From the initial design process to the final touches on your semi-trailer, each step is an opportunity to learn and innovate. Celebrate your craftsmanship as you take your go-kart out for a spin. Remember, safety is paramount, so ensure all mechanics are secure before hitting the road. Enjoy this unique creation, and let it serve as a playful testament to your handiwork and enthusiasm for mini trucks.